The game client
Master Runes runs in your web browser, on PC and on phones, with nothing to install. This guide walks through the whole screen, button by button, so nothing in the client is a mystery.
- Ways to play
- First start: downloading the game data
- Logging in and choosing a character
- The screen at a glance
- Side panel: header
- Equipment, health and mana
- Status icons
- Combat buttons
- Auto-attack
- Exiva vision
- The menu grid
- Systems button
- Minimap
- Battle list and containers
- Mouse controls
- NPC conversations
- Menus and the in-game wiki
- Hotbars
- Chat
- Keyboard shortcuts
- Phones and tablets
Ways to play
- Browser (PC): press Play now on the website. The game opens in the browser; a modern Chrome, Edge or Firefox works best.
- Phone or tablet: open the same page in the phone's browser. The client switches to a touch layout by itself. The first time, a short guide shows how to add the game to your home screen to play in full screen, without browser bars.
First start: downloading the game data
The game keeps all its data on your device (about 105 MB: graphics, item data, minimap and interface images), so walking never waits for graphics. The first time, the client only downloads what Dawnport needs (about 30 MB, Preparing Dawnport…) and lets you in; the rest of the world downloads while you play.
- In game: a small World data NN % bar under the side panel (a ring under the top bar on phones) shows the background download and disappears at 100 %.
- Leaving Dawnport early: if you reach the mainland before 100 %, Finishing download… NN % covers the screen until the rest is ready. A character that is already outside Dawnport waits for 100 % right after logging in.
- Pause / Resume: on the first screen you can pause the download. If you close or reload the page, it continues where it stopped.
- Next visits: the client only checks the data (Checking game data… Up to date) and starts at once. After a game update only the new or changed files are downloaded.
- Mobile data: on a phone using mobile data the client shows the size and asks first. If you choose Not now, you cannot enter the game until the data is downloaded.
- Problems: if the connection drops or the device is out of space, the screen says why and offers Retry; what was already downloaded is kept.
Logging in and choosing a character
- Type your Account and Password and press Log in. If your account uses two-step verification, the client also asks for your authenticator code.
- The Select Character list shows each character with its level, vocation and world. Accounts with Premium show a Premium tag and the days left, with a button to renew it.
- The first time an account enters the game, a Welcome to Master Runes window thanks you for playing and shows every Premium benefit as a tile: tap one to read what it gives. Free accounts get Get Premium (opens the Premium page) and Start playing; Premium accounts see their days left. It opens once per account, on any character or device. The vocation cards are still in the game menu under Vocations.
- Pick a character to enter the game. If you have none yet, the client sends you to the website to create one.
The screen at a glance
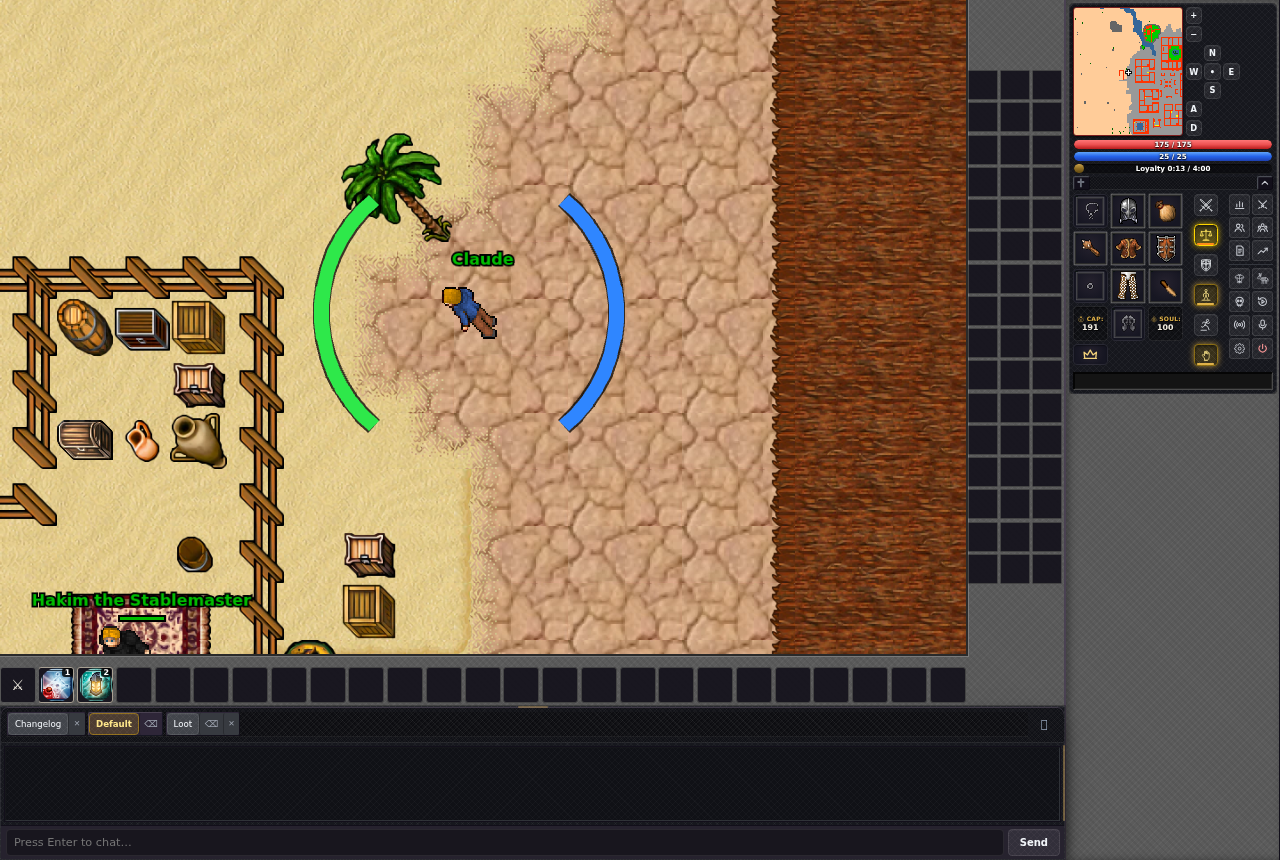
On a PC the game map sits in the middle. The right column holds the minimap at the top, then the side panel (blessings, health, mana, equipment, combat buttons and the menu grid) and the windows you open, such as the battle list, VIP list and containers. The hotbar sits under the map and the chat runs along the bottom.
Side panel: header
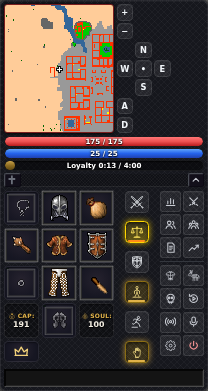
- Blessings (cross icon): grey with none, gold with some (it shows how many) and lit with all seven. Click it to see which of The Wisdom of Solitude, The Spark of the Phoenix, The Fire of the Suns, The Spiritual Shielding, The Embrace of Master Runes, Heart of the Mountain and Blood of the Mountain you have, how much they reduce your death penalty (8% each, +30% if promoted) and your chance to lose equipment. Twist of Fate does not exist on a retro PvP world.
- MRVOX chip: only appears while you are in an MRVOX voice channel. It shows the channel name and how many people are in it. The dot is green when connected, blinks while you talk, turns red when muted and grey when you are away (AFK). The microphone button mutes or unmutes you without leaving the game; clicking the channel name brings MRVOX to the front.
- Collapse: the button on the right hides the equipment, combat buttons and menu grid (Collapse inventory) to leave room for other windows; press it again to bring them back (Expand inventory). The client remembers your choice.
Equipment, health and mana
- Equipment slots: Helmet, Amulet, Backpack, Armor, Weapon, Shield, Ring, Legs, Boots and Ammunition. Empty slots show a faded picture of what goes there. Drag items in and out. Dropping an item on a slot you already wear (an amulet on your amulet, a ring on your ring…), from the ground or from a container, swaps them: you wear the new one and the old one goes where the new one was. Right-click an item to use it, and right-click the backpack to open it. Hover an item to see its name.
- Store Inbox (crown button): opens the box where what you buy in the Store and your daily rewards arrive. It turns red when something new arrives, until you open it.
- Cap: your free capacity in ounces. It turns into a warning colour when it is running low.
- Soul: your soul points, used to make runes.
- Health and mana bars: red and blue, with current and maximum values.
- Ring and amulet timer: equipped rings and amulets that run out show the time left (can be turned off in Settings).
Status icons
The strip at the bottom of the side panel shows what is affecting you. Hover an icon to read its name and how long it still lasts (for example Magic shield — 2:41 left). The most common ones: Poisoned, Burning, Electrified, Drunk, Drowning, Paralysed, Haste, Magic shield, In battle (you cannot log out), PZ locked (you attacked a player and cannot enter protection zones), Protection zone and Hungry (eat something to regenerate). Newer ones: Bleeding, Freezing, Dazzled, Cursed, the three hexes (lesser, intense and greater), Rooted, Feared and Powerless. Icons without a fixed end, like In battle while you keep fighting or Protection zone, show no time.
Combat buttons
| Button | What it does |
|---|---|
| Stand ground | You stay where you are while attacking. |
| Chase opponent | You follow your target while attacking. |
| Secure mode / PvP mode | Secure mode (on by default) stops you from attacking players without a skull by accident. Click it to switch to PvP mode, shown by a white skull with a red glow. |
There are no offensive, balanced or defensive stances: you always fight at full strength. Your choices are saved and applied again the next time you play.
Auto-attack
The ⚔ circle at the left of the hotbar switches auto-attack on and off (✋ while it is on). It only turns on when you click it or switch it on in Settings; it starts off every time you log in. While on, it attacks a creature in view and keeps that target until it dies. NPCs are never picked, and players only with secure mode off and no monster in sight. Right-click the circle (long press on a touch screen) to choose the target: Nearest creature or Lowest health first, and a list of up to 10 creatures to Attack first, in order. You can also add a creature with right-click on it › Attack first. The filters are saved for each character in this browser.
Exiva vision
When you cast exiva "Name", a thin, see-through band like a dream crosses the map: inside it, the real place around that player (the tiles next to them, slightly blurred) with the player walking in it, and an arrow towards them under the band. The answer stays in the status line and the chat as always. It lasts about 4 seconds; click the band or press Esc to close it. Only you see it, and the other player is not told. It never shows the exact place: just the ground around them and how they look right now. Turn it off in Settings › Exiva vision.
The menu grid
Next to the combat buttons there is a grid of 15 icons. Hover one to see its name and what it does. An icon lights up while its function is active: gold means its window is open, red (blinking) means you are casting, and green means you are in MRVOX (it blinks while you talk).
| Button | What it does | Light |
|---|---|---|
| Skills | Opens the Skills window: level, experience, magic level, capacity, soul and your fighting skills. Right-click a row to hide or show it. | Gold while open |
| Battle | Opens the battle list with the creatures and players around you. Click one to attack it. | Gold while open |
| VIP | Your friends list: who is online, and quick messages. | Gold while open |
| Party | Your party window: members, invitations and shared experience. | Gold while open |
| Quests | The Quest Log: the quests you started and their missions. | Gold while open |
| Analyzer | Opens the Hunt Analyzer window: experience per hour, damage, healing, kills, gold and loot per hour, and supplies used. It can be paused, reset and copied as text. | Gold while open |
| Systems | Opens Game Systems, the list of the modern windows: Prey, Task Board, Bestiary, Charms, Bosstiary, Cyclopedia, Store, Wheel of Destiny, Daily Reward and Party Hunt (see Systems button below). | Gold while open |
| Outfit | Change your outfit, its colours (Head, Body, Legs, Feet) and addons. | Gold while open |
| Frags | Your unjustified kills of the last day, week and month, the red skull limits and your skull time. | Gold while open |
| Replay | Shares a replay of your last minutes of play as a link anyone can watch in the browser, without logging in. Only the map is shown, never chat or private messages. You can also share one from the death window. | None |
| Cast | Casting is Premium only because Cast is an extra feature of Master Runes, made for this server; watching is free. Choose who can watch you play: Nobody, My guild or Everyone, the delay (5 to 30 seconds) and whether to show your interface (never your chat). Casts are watched on the website: the window has a Watch live casts on the website → button. | Red, blinking, while you cast |
| Voice | Opens MRVOX, the voice channels of Master Runes, in its own window, already logged in with the character you are playing. Hold the push-to-talk key (V unless you change it in MRVOX) to talk, even while the game window has the focus. MRVOX is Premium only because it is an extra service of Master Runes: our own voice server, built into the game. On a free account the button shows MRVOX voice is a Premium service instead. | Green while connected, blinking while you talk |
| Settings | Game options: controls, hotkeys, interface, performance and more. | None |
| Logout | Leaves the game. Not possible while you are in a fight. | None |
Systems button
Systems in the menu grid (on phones: ☰ menu › Systems) opens Game Systems, with one button per modern window. Imbuing and the Exaltation Forge open when you use an imbuing shrine or the forge, and the quest tracker works by itself in the side column.
| Window | What it is for |
|---|---|
| Prey | Prey bonuses on creatures and hunting tasks. |
| Task Board | Bounty tasks, weekly tasks, their shop and the Soulpit. |
| Bestiary | Your kills of every creature and what you unlocked about it. |
| Charms | Charms bought with the charm points of the Bestiary. |
| Bosstiary | Boss kills and boss slots. |
| Cyclopedia | Your character sheet, every item, the map and the house auctions. |
| Store | Premium time and extras for coins, coin transfers and the purchase history. |
| Wheel of Destiny | The wheel, the gem atelier and presets. |
| Daily Reward | The daily reward wall and your streak. |
| Party Hunt | Loot, supplies and balance of every party member. |
| Imbuing | Opens at an imbuing shrine. |
| Exaltation Forge | Opens at the forge: fusion, transfer, conversion and history. |
| Quest tracker | The missions you follow, in the side column. |
| Supply Stash | What you keep in your supply stash, as last seen this session. Its content comes from the depot: until you use the stash there it only says so. |
- Prey and Task Board →
- Bestiary and Charms →
- Bosstiary →
- Cyclopedia and Party Hunt →
- Store and coins →
- Imbuing →
- Exaltation Forge →
- Wheel of Destiny →
- Daily Reward →
- Quest log and tracker →
Minimap
- It remembers every place you have explored, floor by floor, and centres itself on you when you move.
- Click a spot to walk there. Drag the map to look around.
- Buttons: + and − zoom; N, W, E, S move the view; • centres it on you; A and D show the floor above or below.
- Right-click the minimap for Create mark, Edit mark, Share mark, Delete mark and Open full map. A mark has an icon and a description.
- Share mark gives Copy for chat (paste it in any chat and the others get an Add to my map button) and Copy link (opening the link adds the mark when the game starts).
Battle list and containers
- The Battle window lists what is in view. Click an entry to attack it; right-click it for the same menu as on the map.
- Filter buttons hide players (P), NPCs (N), monsters (M), players without a skull (S) and party members (Pt). Sort by Distance, Health or Name.
- The padlock locks the list so it does not jump around while you click; you can also minimise or close it.
- Containers (backpacks, depot, corpses) open as windows in the side column. Drag items between them, onto the map or onto your equipment.
Mouse controls
| Action | Result |
|---|---|
| Left-click on the map | Walk to that square. |
| Right-click on a creature | Attack it (with Classic Control on). If it cannot be attacked, you look at it instead. |
| Right-click on an item | Use or open it (with Classic Control on). |
| Ctrl + right-click | Opens the menu of that creature or item (Ctrl + left-click also works on creatures). |
| Shift + left-click | Look: the description appears in the chat. |
| Left and right button together | Look, without walking, using or attacking. Works on the map, containers, equipment and the battle list. |
| Alt + right-click on a creature | Follow it, or stop following it. |
| Drag | Move items between the map, containers and equipment. |
With Classic Control off (in Settings), a plain right-click opens the menu instead.
NPC conversations
- Say hi next to an NPC: the conversation opens in a dialog window with what the NPC says.
- Topics, travel destinations and Yes / No answers are buttons: click one and your character says it to the NPC. Bankers offer Balance, Deposit all, Deposit, Withdraw, Transfer and the change of gold, platinum and crystal coins.
- Trade opens the NPC's shop, Back returns to the NPC's topics and Close says goodbye. Walking away also ends the conversation.
- When the NPC asks for an amount or a name, type it in the NPCs chat tab. Typing in the NPC channel still works for everything, as always.
Menus and the in-game wiki
- Item menu: Look, Wiki, Use or Open, Use with…, Rotate, Pick up and Trade with…, depending on the item.
- Creature menu: Look, Wiki, Attack and Follow / Stop follow and, on monsters, Attack first / Remove from attack first.
- Player menu: adds Message to …, Add to VIP list, party invitations, Ignore … / Stop ignoring …, Copy Name and View character (opens the character page on the website).
- Wiki: opens a wiki card inside the game. A creature shows its health, experience and the tabs Loot (with drop chances) and Where. An item shows Buy, Sell (which NPCs trade it, where and for how much) and Dropped by. An NPC shows its city and what it Sells and Buys.
- In the wiki card, click any item or creature in a list to open its own card, go back with ‹, search any creature, NPC or item by name, and use Open in the wiki ↗ to see the same page on the website. Drag the window by its title bar; Esc closes it.
Hotbars
- The bottom hotbar has 24 slots. Turn on Side hotkey bars in Settings for two more bars beside the map, with 48 slots each.
- Click an empty slot to open Add to hotbar, with three tabs: Items (runes, potions, food, tools, rings and amulets from your open containers, or Pick from backpack…), Spells (with level, mana, soul and vocations; spells you cannot cast yet are greyed and Hide unusable hides them) and Text (a line of text to say).
- Click a filled slot for Change…, Assign key…, supply warnings for that item, and Clear.
- Item slots show how many you carry in your open containers. Runes and other targeted items are used with the crosshair by default: press the slot, then click the target. Click the slot and choose Use › On yourself or Use › On target to use it straight away on yourself or on the creature you are attacking (Use › With crosshair goes back).
- Rings and amulets: drag one from your backpack, or straight from its equipment slot, onto a hotbar slot. Pressing the slot or its key puts one from your open containers on in its slot; the one you were wearing goes back to where the new one was. If none is left: You have no … in your open containers.
- Default keys: 1–0 for slots 1–10, the numeric keypad for slots 11–20, and Shift + 1…= for the first slots of the right bar. Any slot can take a letter, a number, a keypad key or F1–F10, alone or with Shift.
Action bars
- Nine action bars of 50 buttons: Bottom 1–3, Left 1–3 and Right 1–3. Bottom 1 is the bar you already had and Right 1 is the side grid; your buttons and keys stay where they were. The arrows at the end of a bar show its hidden buttons.
- Right-click a button (long-press on a phone) for its menu: Assign Spell…, Assign Object…, Assign Multi-Action…, Assign Text…, Assign Passive Ability…, Assign Hotkey…, Clear Action, Lock action bars and Action bar options…. On an empty button you can also type a spell or item name in the quick search and press Enter.
- Assign Spell: tabs All, Attack, Healing, Support and Runes, with level and mana. Spells with a parameter (exani hur, exiva…) keep it on the button (up / down, a name); Sends shows exactly what will be said.
- Assign Object: press Select Object and click the item in your backpack. Use modes: Use on yourself (default for potions), Use on target (the creature you attack), Use at cursor position (the creature or tile under the mouse when you press the key), With crosshair (press, then click the target) and, for rings and amulets, Equip / unequip.
- Smart mode (rings and amulets): if the same item is already worn, the button takes it off; otherwise it puts one on. A worn item gets a green frame on its button. Show amount on the button hides or shows the count.
- Multi-Action: up to three actions (spell, object or text) on one button. A press uses the first one that is ready: if the spell is on cooldown, the next one (for example a potion) is used. The button shows the action that will fire next (or always action I).
- Text: a line for the active chat channel; with Send automatically it is said at once, without it it is only written into the chat line. Passive Ability: a button that cannot be pressed and only shows the cooldown of Gift of Life.
- Assign Hotkey: press the key or combination (letters, digits, F1–F10, Shift+key, Ctrl+F1–F10). If another button already has it, a warning says which one, and Assign anyway moves the key here. Backspace removes the key.
- Lock: the lock at the end of each bar stops drag and drop on it (buttons and items from the backpack). Options: Hotkey preset (each preset has its own buttons and keys: New, Copy, Rename, Delete), Bars shown, and what buttons show: hotkeys, amounts, cooldowns, cooldown seconds, spell parameters, tooltips and greyed unusable actions.
- Action bars do nothing while a window is open in the middle of the screen. Everything is saved in your browser.
Chat
- Tabs: Changelog (new client versions; you can close it), Default (local talk, always there), Server Log (experience, level ups, warnings and look texts), Loot, NPCs (when you talk to one), one tab per private conversation and one per channel you join.
- Each tab has ⌫ to clear it and ✕ to close it. Drag the chat's edges to resize it.
- Channels: press Ctrl + O or the 💬 button to open Channels, pick one, or type a character name to open a private conversation. Public channels: World Chat, English Chat, Help and Advertising. Your guild and party have their own channels.
- Speaking in English Chat and Advertising needs level 20 or a Premium account; World Chat is open from level 2. Advertising allows one offer every two minutes. Misusing Help can get you muted there.
- Private messages: /w Name message or *Name* message, or right-click a player and choose Message to ….
- Whisper and yell: #w message whispers and #y message (or /yell message) yells.
Keyboard shortcuts
| Key | What it does |
|---|---|
| Arrow keys or W A S D | Walk. |
| Q E Z C | Walk diagonally (north-west, north-east, south-west, south-east). Changeable in Settings › Hotkeys. |
| Ctrl + arrow key | Turn to face that way without moving. |
| Esc | Stop attacking or following; also closes windows and leaves the chat box. |
| Enter | Start typing in the chat; Enter again sends the message. |
| Tab / Shift + Tab | Next / previous chat tab. |
| ↑ / ↓ in the chat box | Browse the messages you sent before. |
| Ctrl + O | Open the channel list. |
| Ctrl + R | Mount or dismount. While in the game it does not reload the page (Ctrl + Shift + R still does). |
| V (hold) | Talk in MRVOX while it is open (the key is set in MRVOX). |
| Hotbar keys | Cast the spell or use the item in that slot. |
Phones and tablets
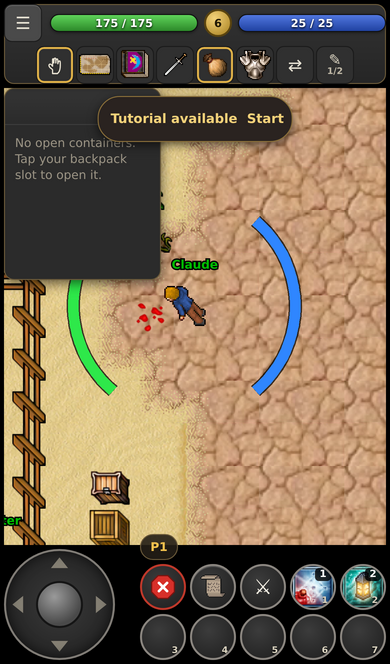
- Moving: a D-pad or a joystick in a bottom corner, or tap a square to walk there (Tap to walk).
- Single tap: attack a creature, or walk to a tile. Tapping near a creature attacks the nearest one around your tap, monsters first, never NPCs.
- Double tap: smart use (open containers, pick up items, use ladders and levers, greet NPCs).
- Long press: opens the menu (Look, Attack, Use, Pick up); hold and drag to move items or push a creature.
- Two-finger tap: the next tap opens the full menu of what you touch.
- Hotbar: tap a round slot to cast or use it; tap ✎ to edit the slots.
- Top bar: the ☰ menu, health, level and mana, and buttons for secure mode, minimap, skills, battle list, containers, equipment, ⇄ to swap the inventory side and ✎ to edit the hotbar (with its page, e.g. 1/2).
- ☰ menu: Skills, Battle, VIP, Party, Outfit, Chat channels, Quest Log, Hunt Analyzer, Systems, Frags, Replay, Cast, Voice, Settings, Log out, Vocations, Touch controls and Replay tutorial.
- Chat button: opens the chat to type, switch channels and send private messages; a badge shows unread messages.